While replacing cabinets is a significant investment, refinishing offers cosmetic upgrades for a fraction of the cost. It’s a smart option for sellers who need to minimize renovation costs and timelines.
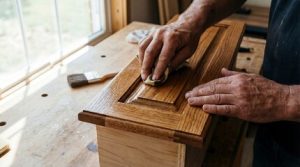
San Jose Cabinet Refinishing involves repair, sanding, and staining or painting the cabinet. It preserves durable materials that home buyers prize and eliminates weeks of demolition and construction mess. The process is also environmentally conscious, minimizing waste and harmful chemicals that can impact indoor air quality.
Increased Home Resale Value
Cabinets are a prominent focal point of the kitchen and bathroom, which means that outdated or worn cabinets can significantly impact how potential buyers perceive your home. Cabinet refinishing offers an affordable solution to give these areas a high-impact aesthetic transformation, boosting overall home resale value.
In today’s competitive housing market, stylish and modern homes are the most appealing to buyers. Buyers are drawn to properties that feel turnkey, and freshly refinished or painted cabinets signal that your home has been well-maintained.
Refinishing is a less disruptive process than a full kitchen or bathroom remodel, minimizing disruption to daily activities and allowing you to continue using your kitchen while the project is underway. Moreover, refinishing is highly customizable, allowing you to choose the exact color and finish that suits your personal style.
While refacing involves installing new doors, drawer fronts, and hardware, it preserves your existing cabinet boxes and offers a more modern look than refinishing. Cabinet refacing is also an eco-friendly choice, as it reduces waste and minimizes the environmental impact of manufacturing new cabinetry.
Which option is best for you depends on the condition of your current cabinets, as well as your budget and desired level of customization. Refinishing is a great option if your cabinet boxes are structurally sound but have begun to show signs of wear and tear, and refacing is better suited for addressing significant damage or aging.
Cabinet refinishing is a cost-effective option that typically delivers a higher ROI than complete cabinet replacement. This allows homeowners to allocate their budget toward other value-adding improvements, such as countertops and appliances.
A refinishing specialist will remove your old stain or paint from the cabinet surfaces, then sand them down to create a smooth surface. Then, your chosen stain or paint is applied to the cabinet surfaces and a protective sealant is applied. Refinishing is a minimally invasive improvement option, allowing you to use your kitchen while the work is being completed and limiting the amount of dust and mess in your home. In contrast, full cabinet replacement often requires extensive demolition and reconstruction, resulting in dust and debris throughout your living spaces.
Higher ROI Statistics
In a competitive housing market, home upgrades that add value and appeal can make all the difference when it comes to selling your home quickly. One of the most significant areas where homeowners often see high ROI from their home improvement projects is in the kitchen. Upgrading or replacing cabinets is a great way to boost your home’s value and attract buyer interest, but which option is best for your specific situation?
Cabinet refinishing is a popular upgrade that can offer both cost savings and higher ROI than full replacement. This process involves sanding down the existing finish and applying a new stain or paint, resulting in a dramatic change in your kitchen’s appearance. This method is ideal for homeowners with limited budgets who want to add value to their home before selling, as it provides a less expensive alternative to full replacement and can still yield an impressive return on investment.
Studies and agent surveys have shown that well-executed cabinet refinishing can add up to 80-90% of its cost when it comes time to sell your home, making it an incredibly effective pre-sale cosmetic renovation. This process requires less time to complete than a full kitchen replacement and is less disruptive to your daily routine, allowing you to continue using your kitchen without having to deal with construction mess and inconvenience. Additionally, refinishing keeps solid cabinet boxes out of landfills and eliminates the waste generated by the demolition and reconstruction that is involved with replacement, making it an eco-friendly choice that appeals to today’s environmentally conscious buyers.
When it comes to adding value and attracting buyer interest, it’s no secret that the kitchen is an essential feature of any home. Outdated or worn cabinets can give the impression that a property hasn’t been cared for, while professionally painted cabinets elevate your kitchen and create a modern, clean aesthetic that buyers are drawn to. Whether you’re planning to sell your home or simply want to improve its appearance before moving, cabinet refinishing can offer a cost-effective and high-impact solution for any homeowner.
Buyer Psychology
Home buyers often look at the kitchen first and examine the cabinets to see if they have enough storage space. A beautiful-looking kitchen can help them make an emotional connection with the house and encourage them to pay a higher price. However, remodels are expensive and can extend the time it takes to sell a home.
Cabinet refacing offers a more affordable option and helps create a desired aesthetic for potential buyers. In addition, refacing can be completed in a shorter timeframe than a full kitchen remodel. Understanding buyer psychology is important to home sellers because lifestyle aspiration can have a strong impact on purchase decisions. For example, high-end buyers may purchase a home with a wine cellar to accommodate their growing collection, but may not end up utilizing it in the long run.
Staging Tips
If you’re ready to list your home, the appearance of your cabinets is a key factor in attracting buyers. But how can you give your kitchen a facelift that attracts buyers without the hefty price tag of full replacement? That’s where staging comes in. By removing personal touches and preparing rooms for the buyer’s lifestyle, a professional stager can help your home sell faster and for more money.
Depending on your goals and budget, the best approach may be refacing or replacing your cabinets. Understanding the pros and cons of each method helps you make the best decision for your situation.
Minimized Dust and Mess
Cabinet refinishing is much less invasive than a full replacement. Tearing out old cabinets and installing new ones creates a lot of dust and mess, which can affect air quality throughout the home. With refacing, the majority of the work takes place in the kitchen itself, minimizing disruption and allowing you to remain in your home while the project is underway.
Both refacing and replacement generate waste materials that need proper disposal or recycling. Choosing a sustainable option like bamboo or reclaimed wood helps minimize the impact. If you’re replacing your cabinets, opt for durable veneers over solid wood to limit the amount of lumber used and support responsible forest management.
Staging Tips
Whether you’re refinishing or replacing your cabinets, you can increase home value by applying simple staging tips. Replace worn-out hardware and knobs with modern, clean-lined versions to instantly freshen your kitchen’s look. Touch up scratches and marks on cabinets and other surfaces with matching stain or paint, and remove items from countertops, including sponges, rags, dish towels, soap dispensers, and paper towel holders.
By following these staging tips, you can help your home stand out from the competition and attract the highest pool of qualified buyers.